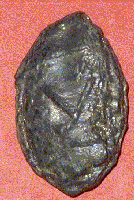
 When I looked around for how to make my own lead bullets, I essentially found four things: lost wax techniques, two-side plaster mould techniques, some stern warning not to use wood moulds, and a photo of a Roman-type wood mould for bullets.
I tried the plaster part and didn’t like it. Then I looked at the stern warning, remembered Robert Heinlein’s Lazarus Long quip (“Ask an expert; he will tell you what you can’t do and why, then go and do it” – or so) and went straight for the wooden mould. (Actually, that’s not totally true – originally : originally, I poured the lead straight into a dried block of clay-ish soil, into forms made by poking a finger into it; mind you – the resulting bullet, even if reworked with pliers, is not beautiful, but it flies, too).
It worked perfectly! The wood is actually quite resistant, even cheaper wood gives easily 10 bullets per mould. So, you sink, say, 7 moulds into a wood board (work: 45 minutes) and you have your own armament factory worth 70 – 100 bullets. With 10 – 15 bullets on the kg (per 2 pounds) you’re in for more than you need for your average training.
And you gain flexibility – I guess that’s what at least some of the Romans loved about it. Wood is more abundant than clay or plaster (which could not “just be flown in” in Roman times, if need was), wood moulds are easily transported, they don’t break fast, are lighter than clay, give a lot of bullets fast and can be scaled up to produce more bullets per man.
I guess that are little things which count when you arrive at camp after a typical Roman Army march of 60 or so miles (16+ hours), must be ready to take on the enemy by sunrise (let’s suppose it’s summer – antique warfare was never in winter), build a fortified camp, cook your meat and bread and produce ammo before midnight to get four hours sleep. Mind you, that was if you didn’t leave the mule train behind and had to carry the damned lead yourself since lunch time (Julius Caesar covered up to 180 km (130 miles) in one go with elite elements of his Xth Legion).
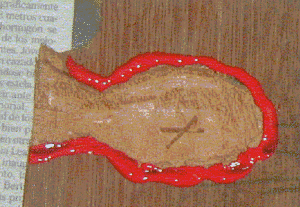
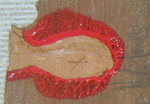
Now, I have found one more advantage: the seam between the two mould halfs. At least the way I do it, it comes out quite sharp, providing a convenient edge.
What’s good about this? Well, as the bullet tumbles in the air, there is a 4:2 chance it will hit the target with a “sharp” angle rather than a “belly”. Factually, it indeed hits the target in 75% of the cases “sharp”, mould seam or points.
And that translates into a very concentrated, pointed energy release and a nasty penetration depth. Where your average stone just tumbles off my foam target (I use foam square targets made for arrow shots), the bullet mostly buries itself fully, sometimes an inch or more deep on a shot from 15 to 20 yards distance.
I guess that’s the ammo which could kill an elephant – just kidding, don’t try it in the zoo ;-).
What you need:
1. A flat wood plank 1″ – 2″ thick
2. The harder the wood, the better – that gives you more bullets per form and makes it easier to achieve smoother surfaces.
3. Wood chisel and hammer
4. Hinge (and screws) to fix the two halfs together
5. Marker to draw the bullet outlines onto the wood
6. Clamps to fix the wood halfs together so they don’t part when you pour the lead in.
7. Sharp pliers to cut of excess lead and give the bullet the final form.
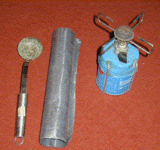
8. Little gas flame as used for camping (and matches)
9. Soup ladle – no wood 😉 And watch for a handle which is protected from the heat, these days they sell you anything…..
10. Lead. I buy lead on roll in the DIY shop; the lead they sell is to water-tighten tiled roofs (around Velux windows or along wall).
Making the mould
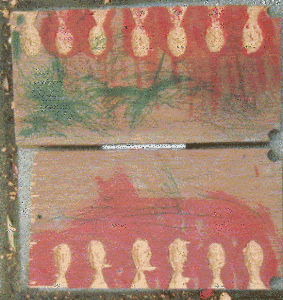
1. Drawing the pellet outline
Easy. Take the marker in one hand. Put the thumb of you other hand onto the wood:
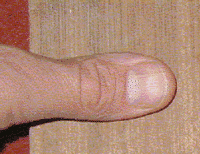
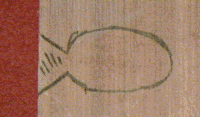
Important: the full outline of the pellet should be an inch (2,54 cm) away from the board’s rim; between the pellet and the rim, you draw a funnel shape – which is where you pour the molten lead into later.
Draw around the outline of your thumb, and you will get this:
Depending on you thumb and how much you squeeze your skin, you get a pellet weight of 60 – 100 g – perfect, in other words. And, while you might not sport almond eyes, you will proudly recognise you sport almond thumbs 😉
2. Carve out the pellet moulds
Carefully hammer the wood chisel vertically along the drawn outline to create resistance. Then take the wood flakes carefully away from right to left, avoiding to split wood at the rim away (lead will pour into it).
Work the chisel deeper towards the centre. After some depth, leave the hammer and pressure-flake the wood away. That’s easy, it’s even intuitive.
Test the depth by putting your thumb in – once it is 1/2 sunk in, stop. So, the pellet mould looks like this:
Mark my signature stamp in the mould!
Now, some eagle-eyed reader will observe that I did not put an air escape channel into the mould. Why? Because I didn’t find it necessary. Yes, if you pour to fast, and even if not, lead can bubble back – but I frankly don’t care. Adds to the atmosphere.
And also, I found lead to be pretty pervasive. It goes everywhere, which is why wood wears out after a time – it’s burned away, until the lead flows from one mould to the next.
Okay, that’s it – you do this six or seven times.
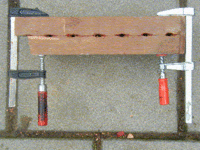
3. Hinge together the mould
To do this, I clamp the two halfs together and fix the hinge onto it. Looks like this:
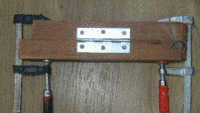
Fix screws, then detach the clamps and open to:
4. Outline opposite pellets parts
To do this, I smear the rims of each pellet mould – the ones “drawn from my thumb” – with acrylic paint or similar thick stuff. And then I close and clamp the mould again, for a second. After reopening, the opposite halfs of the pellets are nicely outlined. I draw the outline with marker and hollow the moulds out as with the first series.
Here the process in pictures. First, marking the carved out mould:
Secondly, closing and reopening the mould. Result:
I skip the marker part….
5. Carve out opposite half
My end result, with artistic support by my baby daughter, looks like this:
As you can see, a father is not always allowed to work symmetrically 😉
But the good news is – we’re ready to make the bullets!
Making The Bullets
I start sensibly by closing the mould and clamping it shut. The clamping is essential; when the hot lead goes in and the air seeps out, there is a significant energy forcing the mould open.
Well, then you use the gas cooker and the lead-melting equipment, melting lead and pouring it into the mould.
Be careful when lead bubbles up (happens), once it has fizzled out, you just fill the mould up again. If you run halfway a mould out of lead, just remelt new lead and fill up; the resulting bullet has a recognisable edge, but otherwise behaves like all good bullets do, flying and hitting like a pro.
The whole process takes, I don’t know what, quarter of an hour or so. Depends on how much gas you have, how big the flame and the ladle and how many kids are peering over your shoulder.
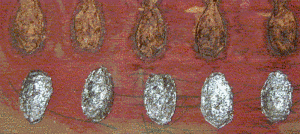
Okay, so here we are with a filled-up mould (six shots):
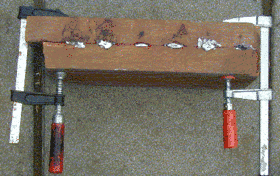
Let it cool down – go and drink a coffee. Because even if you could open the mould nearly immediately, the bullets stay mighty hot for some time, so you cannot get to them easily (if you were a Roman infantry man, you would probably fill up now another mould….).
Once cooled down, you remove the clamps and pry the mould open; that’s a bit tougher than you might think, as if the lead gripped the mould.
Well, here are the beauties still in their forms:
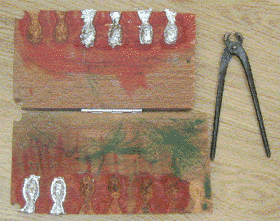
You pick them out – I use the wood chisel for that – and cut off all exess lead with the pliers. You can add this way a bit of edge and points, if you so wish.
The way I work, – primitive, primitive – the surfaces of the bullets is quite rough in the first series; but then, after some shots, the surface smoothens out. Naturally, it’s all in the wood work – I simply have no patience to smoothen the wood mould, all I want is a good sling shot and fun.
So, here is the fresh result. My thumb has one advantage – the bullets weigh between 59 and 62 g. Standard Roman army issue weight! Now, if that’s not reason enough for a swig of mulsum!
Have Fun!